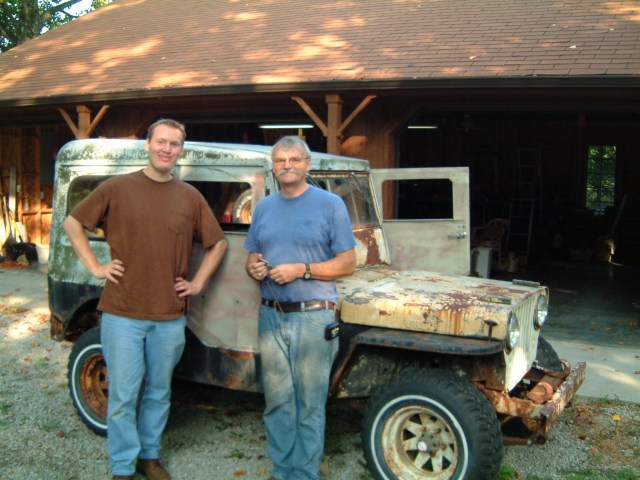
Part 1 – The “JRT”
Originally posted 07/28/2002
What is a JRT?
Humorist / tractor guy Roger Welsch refers to “tractor retrieval trips,” or “TRTs,” in his book “Love, Sex, and Tractors.” The “TRT” traditionally evolves, several people piled into a truck, all-night driving, lying about one’s tractor related exploits, and beer drinking. For some reason when Barry’s friend Rick was told of our impending adventure to pickup the Jeep, he suggested we were embarking on a “Jeep Retrieval Trip,” or “JRT.”

Can you spot our car carrier? 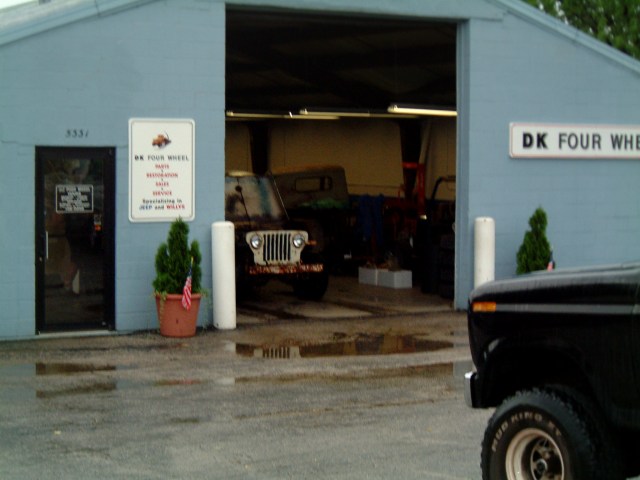
Hood up in the shop… an omen? 
We had room on the trailer for another Jeep 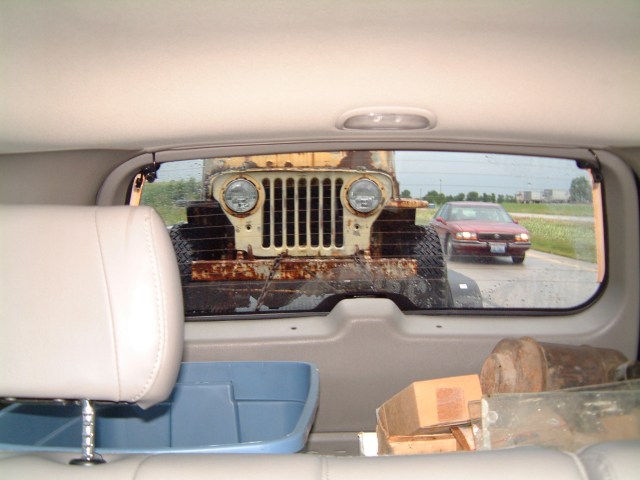
That Jeep is still following us… 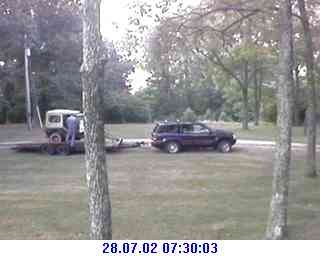
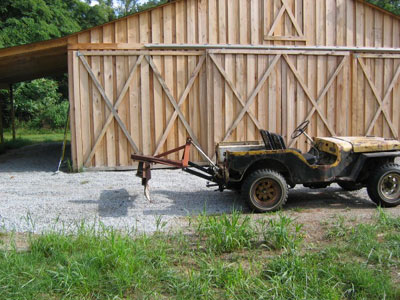
The whole rig at Laswon Hill Farm.
The JRT
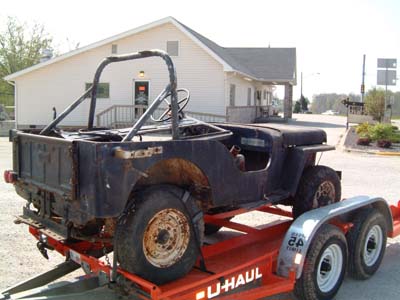
The trip was uneventful (which Barry pointed out was a good thing). As you can see from the pictures, we found our way to the Jeep, got it loaded on the HUGE trailer (with Dave’s help), and do indeed now have the 1947 CJ-2A w/ PTO at its new home on the farm.
Had a great time on our first JRT, hope it’s not our last.
Barry’s notes:
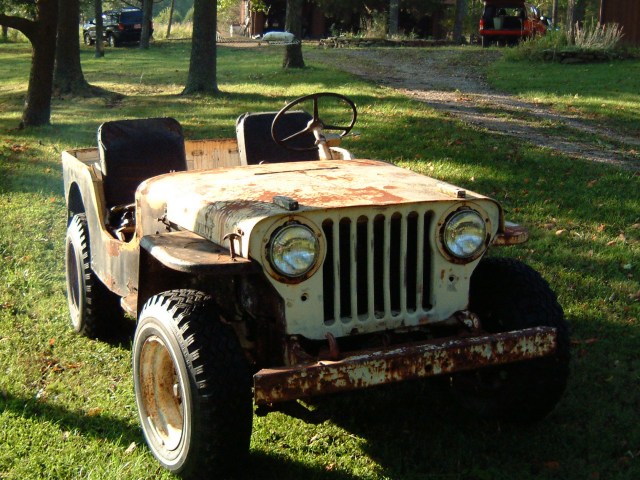
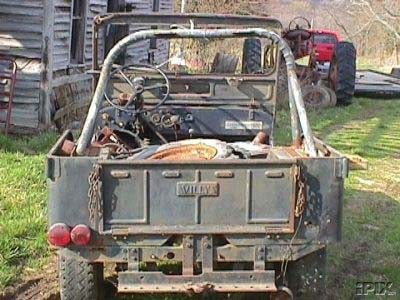
“Old Yeller” isn’t the first Jeep to reside at Lawson Hill Farm. Evan’s grandfather, Paul Lawson, owned 3 “flat fender” Jeeps, including one with a 3 point hitch and PTO. Evan spent his early youth in a ’46 CJ2A. So when “Old Yeller” appeared on e-bay, he could see that this was a “real” Jeep. The fact that it had a PTO (power take off) unit was a real plus. Our goal is to make “Old Yeller” a good running, driving and stopping (always a challenge for old Jeeps) farm vehicle. It may not be returned to show room condition, but we will try to do enough bodywork to make us proud to drive it to the dump and the county fair. This is the fourth Jeep in the extended family; along with Tammy’s Grand Cherokee, “Old Yeller” joins a ’79 CJ7 and a 2001 Cherokee.
Evan’s notes:
A short preamble…
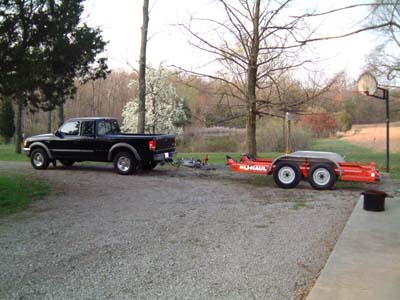
Tammy donated the use of her 2000 Grand Cherokee Limited as our tow vehicle and it was awesome! I’ve teased Tammy mercilessly about her Jeep having literally every option. I must now repent and apologize for all my teasing; the V8 and tow package made the trip possible, and the 10 Disc CD-Changer and power leather seats made it pretty swank.
As for the trip itself…
Ate Indian food and drank a very nice Indian beer, Flying Horse, to cap off our first day on the road.
I-74 across Indiana and Illinois is, well… boring. We made good time, didn’t get too lost, and arrived at our “new” CJ-2A.
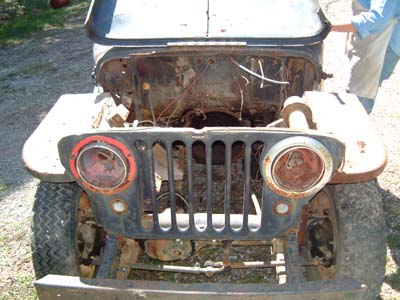
We bought the Jeep from Dave at D K Four Wheel in Moline, IL. Dave was as good as his word, the Jeep was exactly has he had described it; rough, solid frame, and it even started on the first crank! Dave was kind enough to give us a tour of his shop and brave enough to load the brakeless’47 on the trailer. He went above and beyond by helping us diagnose our trailer light problem (in the rain no less). Thanks again Dave!
Tammy’s ‘00 GC Limited pulled the ’47 without compliant; we drove home without incident (I did however hold my breath through the construction zones in an attempt to make our trailer narrower) back along I-74 and it was still just as boring.
Part 2 – The 1st day
Originally posted 07/30/2002
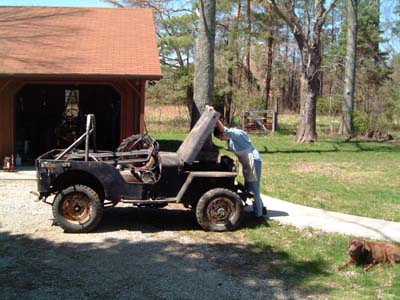
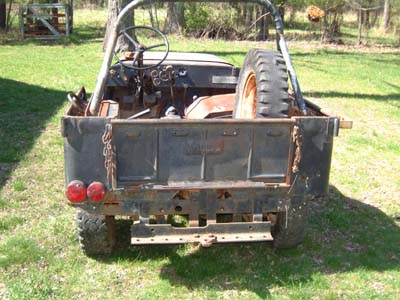
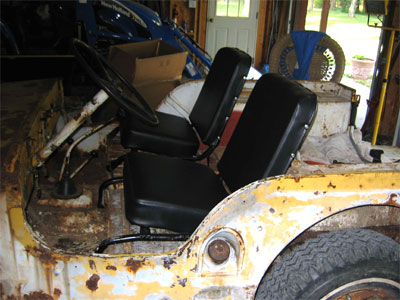
| The 1st day This is truly a family project, and the pictures here show the entire crew at work on the first day. Tradition has it that Jeeps coming to Lawson Hill Farm are stripped of their tops and windshield, to make driving through the woods easier. So once Evan drove the Jeep off the trailer (great fun with no brakes!), we proceeded to remove the top and windshield. |
Evan and Barry ready to start 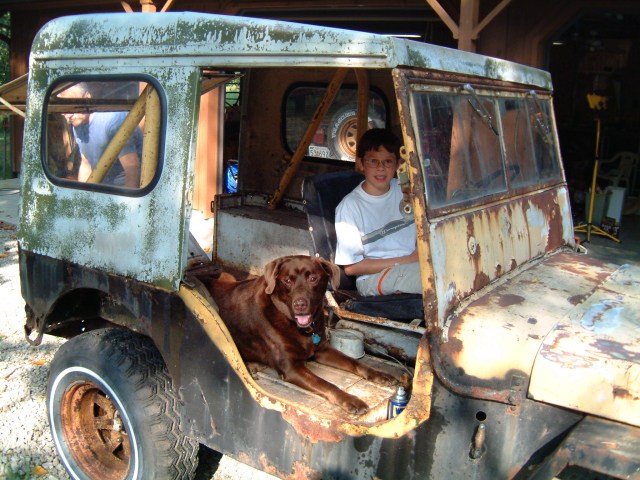
Frank Jamerson and number 1 Jeep dog Bruin work on the interior 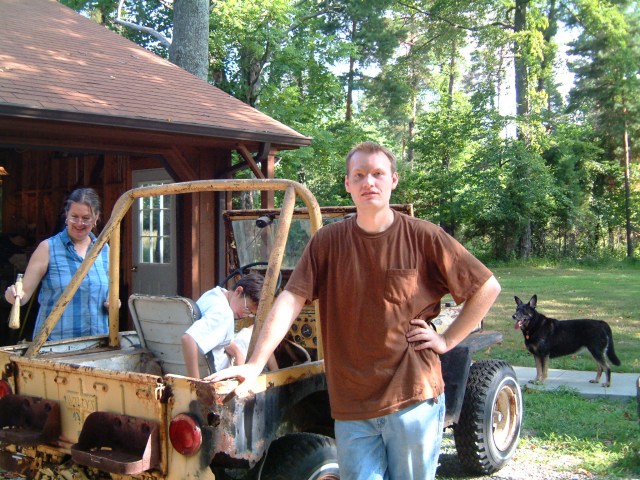
With the top off, Evan takes a break while Paula and Frank clean the interior of 55 years of dirt and rust 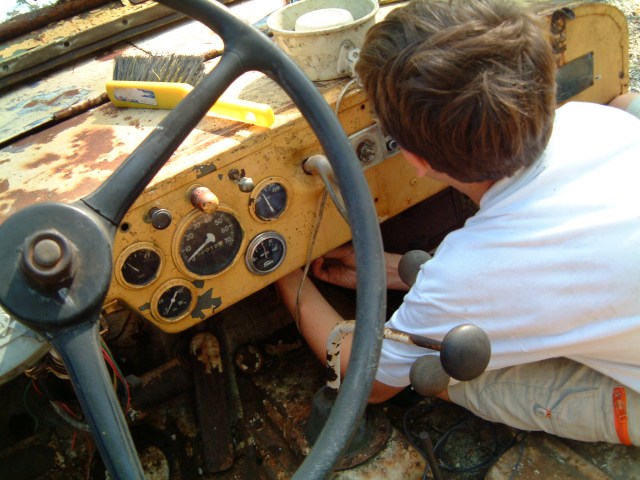
Frank removes the non-functioning, non-standard radio 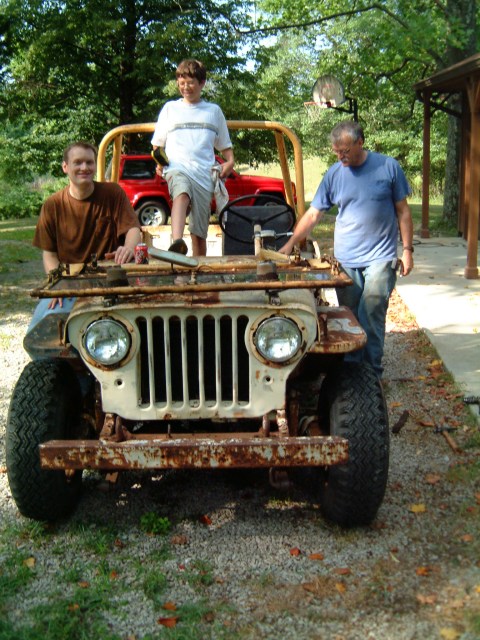
The windshield gets folded, probably for the first time in several decades (Bondo had been used to seal the top to the windshield frame) 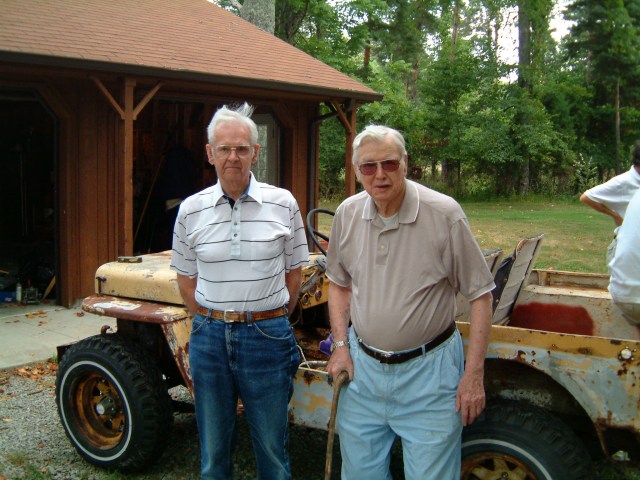
The two chief mechanics, Forrest Thomas and Paul “PD” Lawson, prepare for the first general inspection 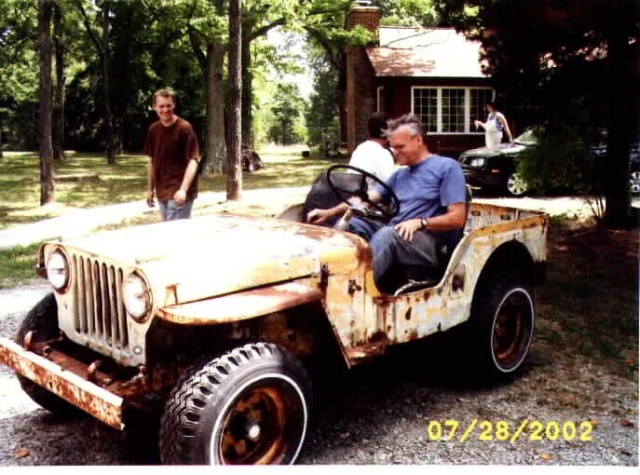
Barry takes a turn at the wheel 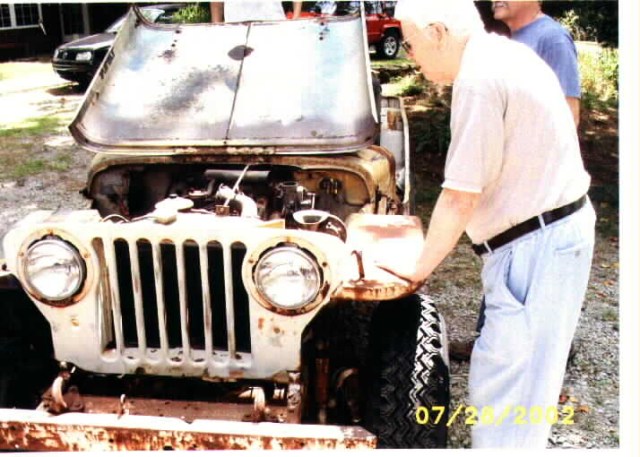
Chief mechanic PD inspects the motor (it passed the initial inspection!) 
Evan was able to provide test rides to everyone, proving once again that real Jeeps don’t need brakes!
Barry’s notes:
The biggest surprise was how good the engine sounded and how well the Jeep drove (with the exception of no brakes). The transmission and transfer case worked well and won’t require much work. Off to a good start!
Evan’s notes:
I had the privilege of being the test driver on the 1st day. As dad (Barry) said in his notes on Part1, I spent my early youth being hauled about in a ’46 CJ-2A. We sold the old ’46 before I was 10, and even though I spent many hours behind the wheel of that old ’46, it was always parked (my legs were too short to reach the pedals), so today was my first chance to drive a CJ-2A. It drove wonderfully! Although I must admit the experience might have been better if “Old Yeller” had any brakes whatsoever, but being a good farm-boy I used the transmission to slow the Jeep when necessary and all who dared to ride with me survived the day. Both grandfathers, PD and Forrest, seemed to enjoy their turns in the passenger seat and when I commented to Forrest about the steering response at low speed (or lack there of), he said “they’re like that,” which I’ll take as accurate wisdom from someone who has driven his share. As dad said, it was a good start.
Part 3 – Breaks and Brakes
Originally posted 08/09/2002
Breaks
The plan was to do a quick tune-up (oil change, spark plugs, new fan belt), a little brake work, and move on to tooling around in “Old Yeller.” That was the plan…
The good: the number 1 and 4 plugs came out perfectly.
The bad: number 3 plug is about to snap off.
The ugly: number 2 broke off in the head.
After consulting the expert mechanics in and out of the family, we bought a couple of cans of PB Blaster and are soaking the remainder of the plugs stuck in the head until next weekend. Patience they say, shall deliver us from re-tapping the head… we’ll see.
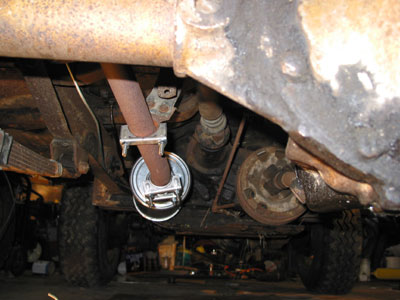
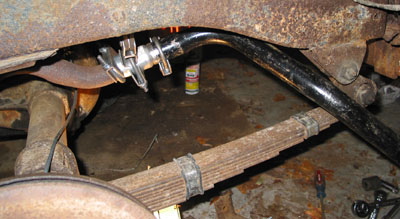
Brakes
Changing out the old master cylinder was a piece of cake; unfortunately it didn’t solve our brake problems. It appears the Jeep has been stopping on the rear brakes for years. The front drums are rusted and unused. One rear brake spring was broken and only the passenger rear brake looked normal. it appears the PO (previous owner) hadn’t been too concerned about stopping for some time
Barry with examples of whole and broken spark plugs 
The head with a piece of the #2 plug stuck in it 
Plugs shouldn’t look like this 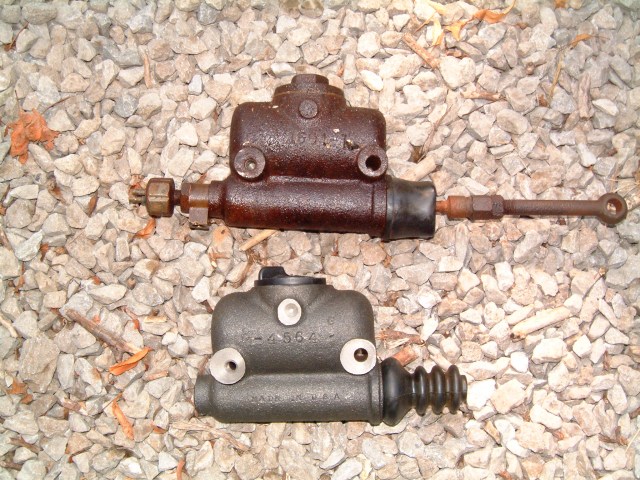
Master cylinders, old and new 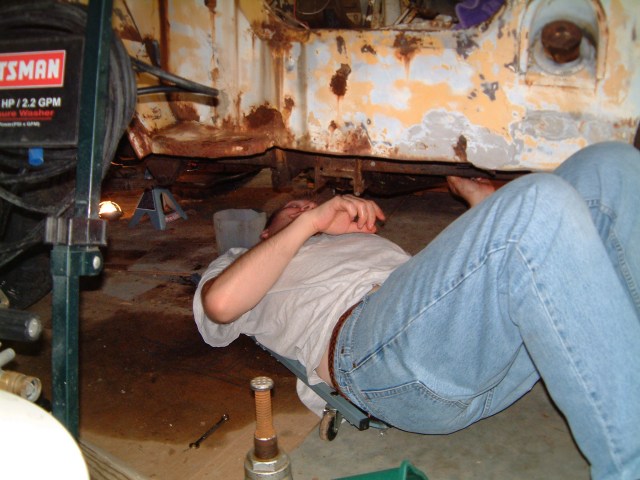
Evan installing the new master cylinder
Barry’s notes:
I remember the old ’46 had the plugs “rust welded” to the head. When we would blow a head gasket, we cleaned the plugs the best we could with the head removed. I wouldn’t be surprised if these plugs have been doing their job for a couple of decades or more. Can hardly wait to see how it will run with new plugs. Parts are on order. The cost meter is running.
Evan’s notes:
While crawling around under the Jeep I was really pleased with how good the frame and mechanicals looked. Unfortunately, as you would expect the body looks much worse from below; in fact the hardest part of installing the master cylinder was keeping the pieces of body (rust) from falling off into my eyes. While we were under there, we hit all the grease fittings on the chassis (probably the first time they’ve been lubed in decades). Other items of interest included the discovery that all the lugs on the driver side wheels are left hand thread. This isn’t a problem once you figure it out, but it does make getting that first lug nut off a bit frustrating. We also have four different style wheel hubs, again it’s not really a problem, it just took four different methods to get all the hubs off.
Part 4 – Re-headed and Re-braked
Originally posted 09/29/2002
Heads Up (and off)
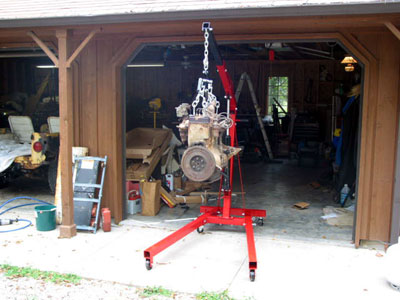
After a week of “PB Blaster” soaking, Barry gave the number 3 plug a gentle twist. It kept right on going and looked just like the number 2. Evan had purchased a new “Easy Out” tool, so we gave it a try. Neither plug would budge and we determined the head would have to come off. One of the joys of working on the Willys is that everything is pretty simple. Lots of room to work and not lots of things bolted to engine. Getting the head off looked pretty easy and it actually turned out to be pretty straight forward. We drained the radiator, removed the radiator support rod and the top radiator hose. While he was undoing the plumbing, Evan removed the old Chevy heater from under the dash. The heater hoses had been routed in such as way as to prevent the air cleaner from being located in its proper place on the firewall. Real Jeeps don’t have heaters – not old Chevy heaters anyway. Next, Evan attacked the head bolts with an impact wrench. The couple of weeks spent soaking in “PB Blaster” paid off and the nuts came off without any problems. Once everything was unbolted, we were able to insert a thin screwdriver blade between the head and engine block. Not wanting to damage the head or block surface, we took several minutes of gentle persuasion to break the gasket seal. Once the head was free all around, the two of us were able to lift the head up and off.
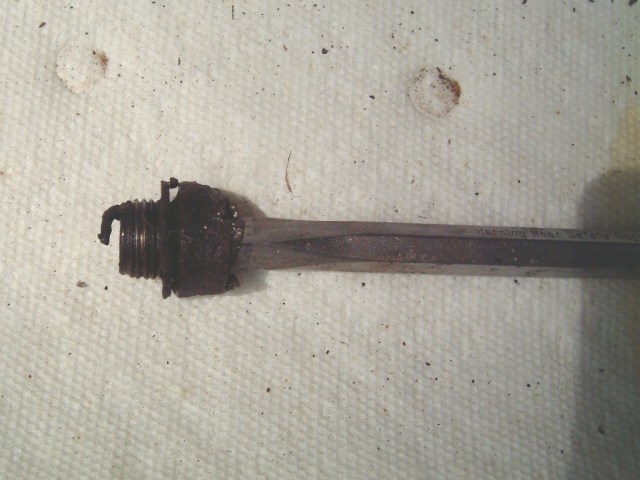
Plug removal tool
(cold chisel hammered through a broken plug)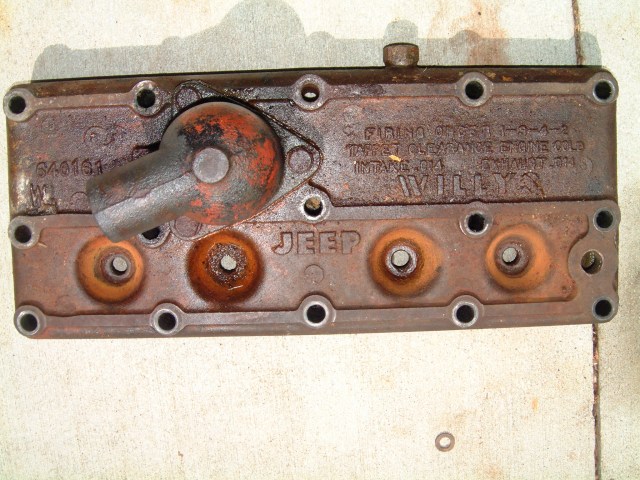
Head without plugs 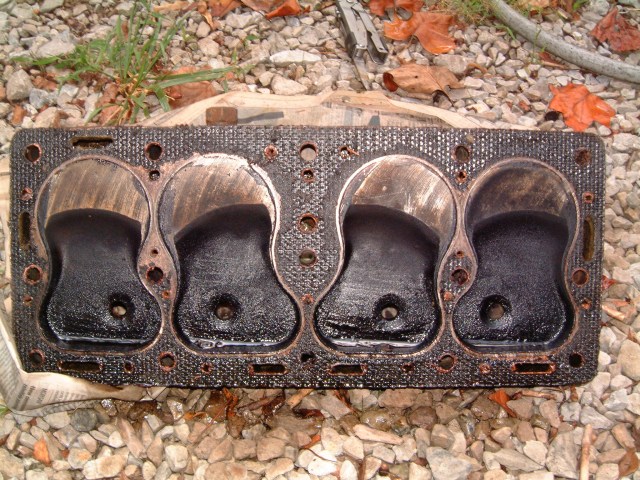
Carbon build-up on the bottom of the head
A Bad Head Ache
With the head off, we began our plan of attack. It was easy to see that the plugs had become a part of the head. We were determined not to damage the head if at all possible, but it was clear that it was going to some real force to break the rust bond between the plugs and the head. We tried a couple of different approaches, including using a chisel to bend the plug toward the middle of the hole. Nothing seemed to be working. Evan came up with the idea of driving a small chisel into the plug body and using a wrench to turn the chisel (and the plug). With Evan standing on top of the head to prevent it from moving, Barry tried turning the chisel with an adjustable wrench. Nothing moved. With a little Brown County engineering (a term of endearment akin to Rube Goldberg) we ground the chisel down so that a closed-end wrench would fit it. We drove the chisel into the plug and slipped the wrench (a Craftsman) over the chisel and slipped a 3 foot cheater bar over the wrench. With Evan standing on the head and Barry on the end of the cheater bar the grunting got serious. While applying steady but increasing pressure, Ev spied movement. More “PB Blaster” and slow movements back and forth. Once it was evident that we were making progress, we took our time working the plug out. It did finally come out and much to our relief, the plug base was intact and the threads didn’t appear to be damaged. After a brief celebration (including a visit to the garage beer frig) we attacked the second plug with the same approach. This time Barry stood on the head and Evan manned the cheater bar, but the results were the same. After another 30 minutes, the second plug was out and there was much joy in the Willys garage! The head was inspected by the chief mechanics and pronounced in excellent shape. They did recommend cleaning the plug threads by running an old plug in and out several times, while applying “PB Blaster”. We also took the time to carefully clean off the old gasket and to remove as much carbon as we could from the head and engine block. Before we could put the head back on, we needed to acquire a new head gasket.
Brake Down
While Evan had worked on removing the head, Barry returned to the brake problems. As described in Part three, the Jeep appears to have had one operational brake (passenger rear) for some time. All of the wheel cylinders appeared to be leaking and would need to be replaced. The metal brake lines appear to have been replaced at some distant point. The PO apparently purchased standard length brake lines and wrapped them around a beer can to shorten them to proper length. The rubber hoses (there are four) looked original and had to be replaced. Luckily, new wheel cylinders and hoses are available, so those were ordered. Three of the four brake drums were in good shape (they haven’t been used!). The passenger front was grooved. The reason became clear when Barry was removing the front brake lines. The PO has routed the brake on top of the axle/spring clamp. At some point, the PO had smashed the axle against the frame (visions of an airborne Jeep!) and had flattened the line, most likely while the there was a foot on the brake pedal. The result was that the front brake was locked against the drum until the shoe wore away. The brake experts at a local brake shop just scratched their heads when Barry took the drum in to be turned. There best advice was to clean it up with some sandpaper and put it back on. While we ordered the rubber hoses, we decided to build our own lines. Another tool purchase opportunity! Off to Sears to purchase a “double flare” tool and a small tubing bender. These ran the “Restoration Costometer” up a mere $25. Barry managed to break the flaring tube body, but Chief Mechanic Forrest supplied a replacement. The entire brake lines were replaced, with the exception of two small “S” located on at the front wheels. These were taken off and thoroughly cleaned. Work stopped for parts. More importantly, we had to go on a backpacking trip in the mountains of Colorado. So the Jeep would have to wait a couple of weeks.
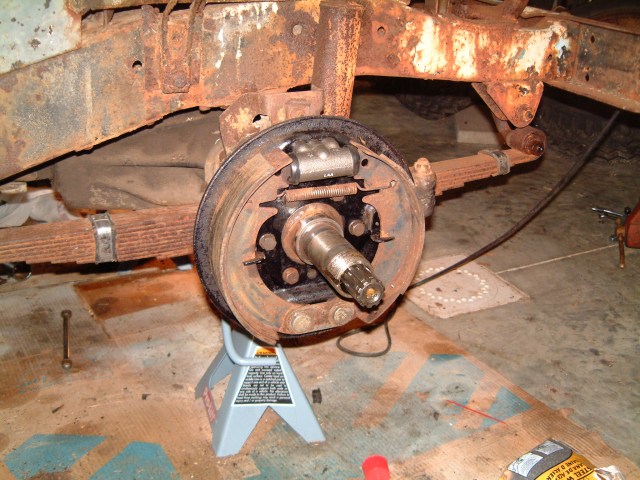
Front passenger side brake 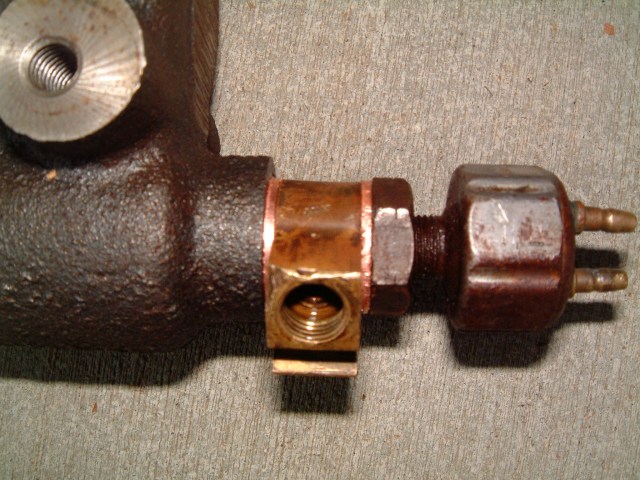
Copper washers on brake MC 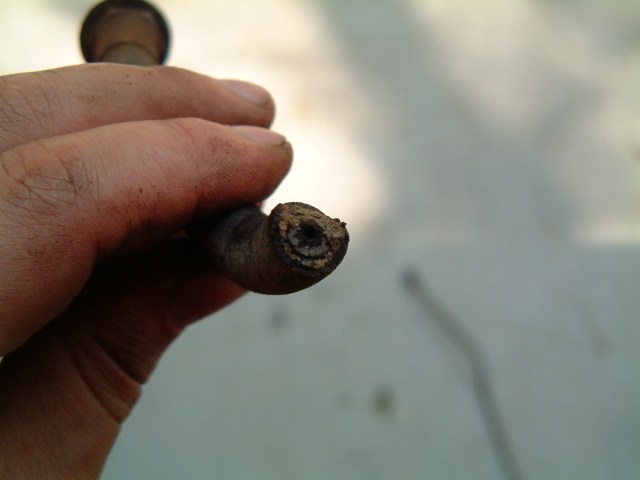
Completely blocked front brake line 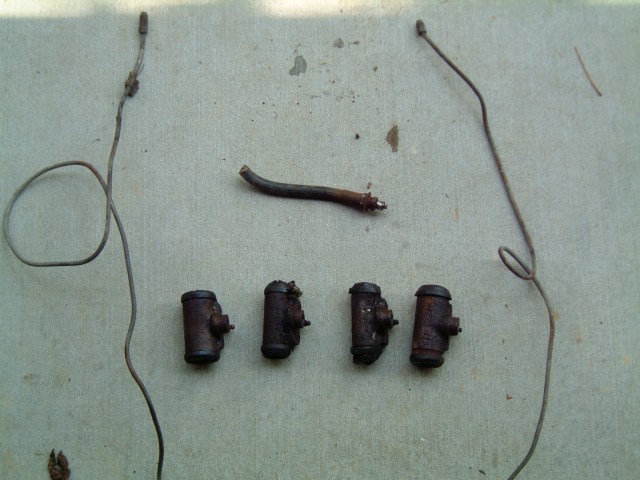
Brake lines that appear to have been wrapped around a beer can
Meanwhile, Back at the Wrench
Back from the mountains, we started on a Saturday morning with the goal of having the Jeep running AND stopping by afternoon. Barry had been able to get the wheel cylinders and brake shoes replaced, along with attaching all the new brake lines. Time for a test. Evan supplied the foot power, stepping on the pedal, while Barry watched for leaks. There were plenty! Most of the leaks were quickly fixed by simply tightening the connection. A leak at the master cylinder presented more of a challenge. Copper washers are used between the master cylinder and the brake line connector. We had tried to reuse the old washers when we replaced the master cylinder, but they leaked. We were able to find similar, but not exact washers at NAPA and had filed and cut them to fit. It took several tries with Evan and Barry taking turns trying to tighten the fitting. Final the leaks were stopped and the moment of truth arrived. With Evan at the pedal, Barry spun each wheel and called for Evan to hit the brakes. And all the brakes worked! Time for another celebration and a trip to the beer frig. The next step was to get the head back in place. Following the chief mechanics’ instructions, we applied a small amount of grease to the edges of the new head gasket and slipped it on the head. The two of us lifted the head in place and Evan was left to put everything back together.
What!? No Parts Left?
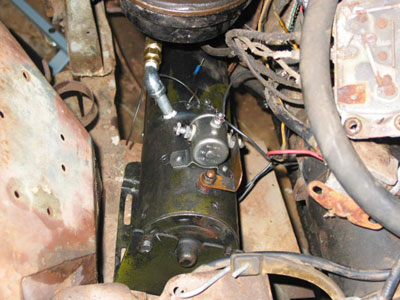
Evan started the reassembly while Barry remounted the wheels and took the Jeep off the jack stands. The Jeep was quickly back on the ground. Evan took his time and torqued the head according to the bolt sequence in the service manual. Evan had wisely marked the plug wires and the engine was quickly reassembled. Hoses were reattached and new antifreeze added to the radiator. The moment of truth. No parts were left over and the time had come to turn the key. Barry did the honors and… nothing. The battery had died and wouldn’t turn the engine. The Jeep was pushed outside and we used the Cherokee to jump start the engine. After a few cranks, the engine started and sounded great! Evan took the wheel and the Jeep was alive again! Next, a new battery, a new exhaust system and some adjustments to the PTO!
Barry’s notes:
I think this Jeep has had a rough life. The left front axle has been replaced (it doesn’t match the other side) and the tow hooks attached to the front bumper have been bent. But the engine seems strong and the Jeep seems to have taken the abuse and seems ready for a new life. It sure is fun to drive.
Evan’s notes:
While the brakes aren’t quite up to today’s standards, I was pleased with their performance. Barry thinks we can adjust and re-bleed the brakes and improve the stopping ability even more, but for now just being able to stop is a BIG improvement.
Part 5 – Part(s) of the Adventure
Originally posted 01/06/2003
Jeeps aren’t made, they’re built
There is a slogan among hardcore Jeepers that “Jeeps aren’t made, they’re built.” The fall season was spent spending money and tracking down parts to build our farm Jeep. We mail-ordered a number of small items, but had two PRTs (parts retrieval trips) worthy of note.
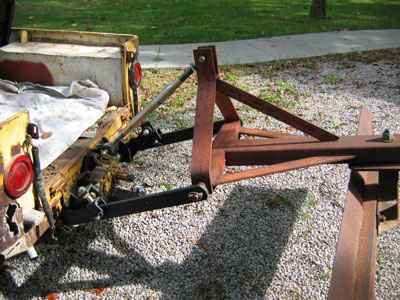
Through the wonders of e-bay, we found and “won” a 3 point hitch. This was a major find and will be a distinguishing feature of our farm Jeep. You can read all about our Newgren hitch here. The current home of the lift was somewhere east of Cleveland in a junkyard, a mere 700 mile roundtrip. So, on a beautiful October day we headed northeast to Cleveland.
The trip was uneventful and gave us a chance to see the fall colors and some beautiful Ohio farmland. We found the “junkyard” without a problem. It was perhaps, the neatest junkyard either of us had ever seen. Cars and trucks were sorted and neatly lined up in rows. They weren’t pretty, but the owner assured us that it was a great system for making sure he could find and get to any part you might desire. Unfortunately, that didn’t include Jeep parts. Although we had come equipped with a complete set of tools, the only Jeep in the yard was a CJ6 that had been stripped of all the good stuff.
The lift PRT return trip was just as nice, with lots of time spent scouting along the interstate for signs of more old Jeeps.
The second PRT was more of an adventure for Barry. Evan had located a Jeep hydraulic pump that we can use with our Newgren lift, until we can find an original crank pulley-driven pump. The owner had listed the pump with the option of a “free” snowplow if you picked the pump up (as opposed to the sensible idea of having it shipped). Barry, unable to pass up a freebie, volunteered to make the PRT on his own. Evan was a little less sure of what we might do with a snowplow taken off of a 1956 Jeep pickup, but agreed the price was right.
This PRT found Barry again Ohio bound. This time the destination was Zanesville, Ohio. Unlike the lift trip, the weather was terrible, with driving rain and high winds. But a deal is a deal and Barry headed out early on a Friday morning on his PPRT (plow parts retrieval trip). The trip was highlighted by massive traffic jams around Cincinnati and the complete shut-down of the I-70 through downtown Columbus, OH due to a fuel spill.
Prized Newgren lift 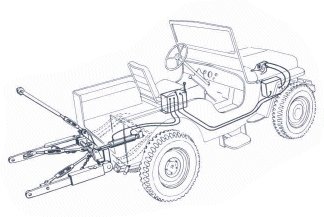
Lift diagram – Newgren mounts beneath rear bumper 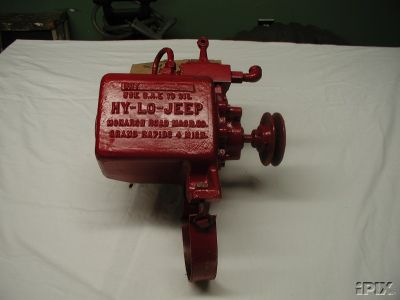
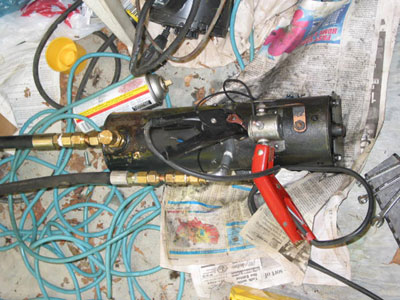
Hy-Lo Hydraulic Pump 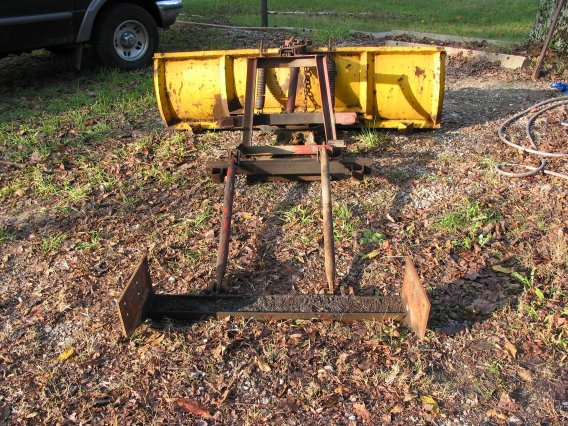
Scheneker Snow Plow 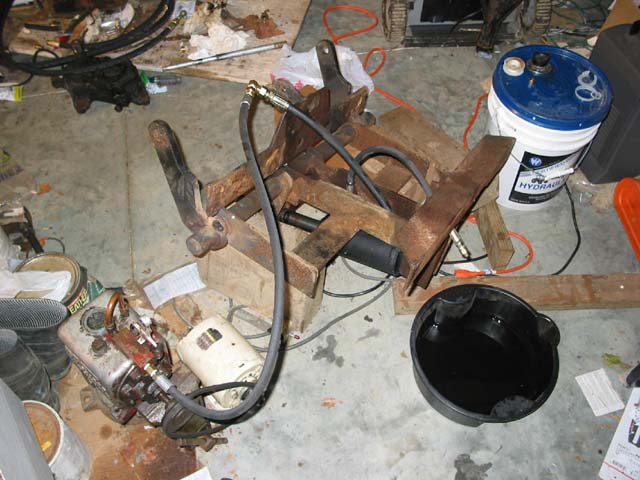
Barry’s (Rube Goldberg) lift test setup
Barry managed to find the farm were the pump and plow were located, just outside of Zanesville. The farm had several outbuildings, including a multi level barn, that was open on the bottom. Barry could see several old Jeep wagons and trucks, along with a ’47 Ford pickup (he asked) and assorted antique farm equipment parked inside. The farmer would only say the Jeeps belonged to “friends” and wasn’t interested in giving Barry a tour. The plow was quickly loaded from the back of an old Suburban (it was a sort of moveable storage shed) into Barry’s pickup.
The return trip was more traffic and more rain, but safe. The pump and plow made it back to the farm. The pump is undergoing test and the snow plow is in the field, awaiting a new owner – or maybe a new Willys truck might find its way home someday.
Barry’s notes:
I had originally thought that the plow might work on the CJ2a. But it is huge and is more weight than I would ever put on that old frame. I have also thought about mounting the blade on my tractor. At least when we find the correct pump we can sell whole outfit to someone with a Willy’s PU.
Evan’s notes:
We agreed that a hydraulic lift was a must for our CJ-2A and had gone after the few we’d seen on e-bay and posted on Jeep-related newsgroups. As you would expect, one good purchase deserves another. Not only did we end up buying the snow plow for the hydraulic pump to power the lift, we also bought an engine governor to complete the basics of our farm Jeep setup.
Part 6 – That Sounds Better
Originally posted 01/14/2003
Tuned-up and a bad case of gas
Once we had brakes, the “Go Devil” L-134 engine back together, and a new battery, it is was time for some test driving. Barry remembered being able to lope the old ’46 along in low-low at barely more than an idle, but the ’47 would stall with any load or even when accelerating to go up a slight grade. Master mechanic PD took a test spin in the meadow and commented that “it sounds like it is missing on one cylinder.” A basic tune-up was in order.
We installed a new distributor cap, rotor, plug wires, and another new set of plugs. Even though we had just installed new plugs (you will remember what it took to get the old ones out) we noticed carbon build-up on the tips and the chief mechanics thought perhaps a hotter plug might solve the problem.
The chief mechanics still thought it sounded like it was missing, so next came a new set of points and an adjustment to the timing using the chief mechanics’ ears for a well running engine.
All the basic tune-up work seemed to make no difference with the stalling when accelerating. A general discussion among the chiefs and other mechanics determined it was a fuel problem, most likely a bad accelerator pump. A search of the Willys Tech group turned up a note on a quick and simple test. The carburetor passed with flying colors, so the problem had to be elsewhere.
The Jeep still hasn’t been driven all that much, so one working theory was that there might be a little water in the gas. A fill-up with premium grade and a little gas-additive also seemed to help with the stalling. There was no eureka moments, but all the small changes dramatically improved the engines performance and now the ’47 passes Barry’s low-low lope test.
Exhausted
We’d always known we’d needed to install a new muffler and tailpipe, but a significant back-fire during the tune-up process blew the remainder of the original muffler to pieces and left no doubt the exhaust system needed some attention. The Newgren implement lift we’d purchased mounts under the rear cargo area and requires the exhaust system be rerouted and the muffler and tailpipe be moved from out the passenger side rear quarter panel to behind the drivers side rear wheel.
The 1947 instructions for mounting the lift include details on moving the exhaust. The diagram at the end of the instructions is somewhat misleading and Barry spend a few hours of moving parts around trying to make it work. The first picture on the A Day with a Farm Jeep site clearly shows the exhaust exiting at the driver side rear. Using this evidence and ignoring the instruction drawings, Barry was able to replace and move the muffler, use part of the existing pipe that was curved to fit over the rear axle and attach the tail piece so that the exhaust now exits the drivers side rear. There appear to be an inordinate number of muffler clamps involved, but it works!
Barry’s notes:
I am still amazed at how important sound is in working with these old motors. Both grandfathers would confess to hearing loss, but both also could hear engine misfires when it sounded fine to me and detect even subtle changes when doing the timing. I’ve used my dad several times to help me set the timing on my old tractors and my CJ-7. Using a timing light and specs doesn’t always work well on old motors. There is enough wear and tear that requires compensation and that is where experience and good ears makes the difference.
Part 7 – The Rites of Spring
Originally posted 04/07/2003
Too Cold to Tinker
“Old Yeller” lives with Barry on the old family farm outside Columbus, IN; the same farm were Paul D. Lawson (better known as P.D.) had the three other flat fenders (CJ-2As, 3As, and 3Bs) that inspired the Farm Jeep project. Indiana experience its snowiest (and seemingly longest) winter in 100 years and with “Old Yeller” wintering in an unheated detached garage, it should come as no surprise that not a lot has been done with Jeep through the winter months.
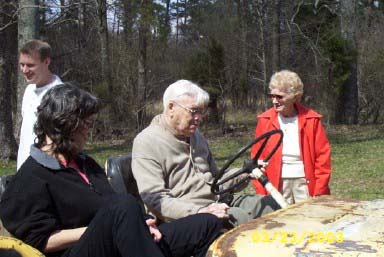
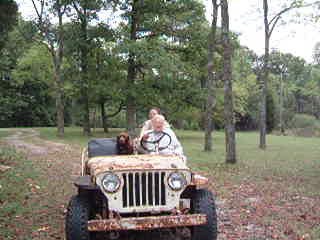
PD at the wheel with Sally as co-pilot 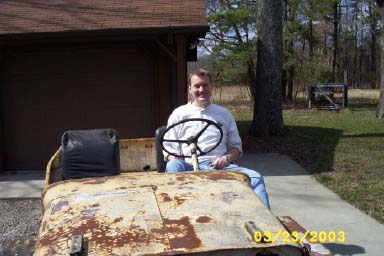
A Family that Jeeps Together…
March 21 is not only the first day of spring, but also P.D.’s birthday, this year being the 91st edition. The weather was perfect day family and friends gathered to celebrate P.D.’s 91st with the thermometer soaring into the upper 60°s and not a cloud in the sky. After enjoying the great food and the better company, we fired up “Old Yeller” and honored P.D.’s birthday request for a drive. After P.D.’s turn behind the wheel, our cousin Sally took a turn driving the ’47, which one would assume handles quite a bit differently than her 2000 Jeep Wrangler. Sally came by the Jeep bug naturally, she and her Uncle Paul (it’s still P.D. to everyone else) use to race through the woods in the original flat fenders with imaginary Indians always gaining on them. Sally’s son Frank (pictured in Part 2 removing the non-standard radio) went on every ride offered and can’t wait to drive ’47, proving the Jeep bug is either hereditary, or contagious, or both.
Jeep rides with the top down and the windshield off, not only add 10 years to your life, but are a sure sign spring is upon us.
Barry’s notes:
Minor things did happen over the winter (Part 6). A new muffler was installed according to the Newgren lift instructions. The exhaust had to be relocated from underneath the rear deck where the muffler is normally found. It now is located on the drivers side, with the tail pipe exiting on the driver’s side rear. The PTO shaft, PTO unit and the old hitch have been removed, making way for the lift.
Evan’s notes:
I’ve always had a little trouble getting in and out of “Old Yeller,” at 6’3” I’m perhaps a little taller than the average Willys driver. My grandfather P.D. is 6’ and at 91 (with a bad hip to boot) getting in and out of the Jeep is a little… tricky. Since none of us are getting any younger, maybe I should consider a newer model with a little more room… maybe a ’49 CJ-3A… power steering would be nice too, did that show up on the ’53 CJ-3B or the ’55 CJ-5?
Part 8 – JRT Take Two
and Project “Ole Blue” Part 1 – JRT Take Two
Originally posted 04/15/2003
The Dangers of e-bay
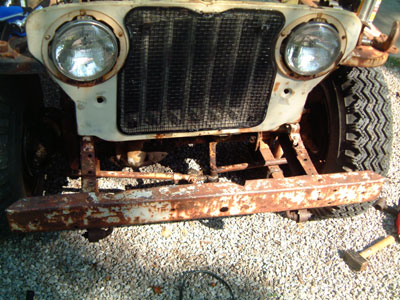
The warm spring sunlight shown unflatteringly on the rusted remains of “Old Yeller’s” rear quarter-panels; there’s some sort of barnacle growing on the hood and nothing but sheer force of habit is holding the passenger side front fender in place: We’ve got body issues! Our friend Dottie, whom no one would confuse with a Jeep person, summed the situation when she asked “what doesn’t need to be replaced?”
We’ve known all along what we really dragged home was a frame, engine, and drive train awaiting a body transplant. We’ve also been (unsuccessfully) saving our pennies for a “repli-tub” from Willys-Overland and planning when to start the frame-off portion of the project. Then along came e-bay…
Both Barry and Evan scour e-bay for obscure Jeep parts (particularly hydraulic lift parts, governors, and hydraulic pumps) and browse the other Jeep sections for entertainment. Among the 6000+ Jeep items we found, and eventually won, a ’47 CJ-2A with no motor, but a body that not only looked good, but totally original. Best of all the Jeep was in southern Indiana just a couple hours away. Time for another JRT! That’s “Jeep Retrieval Trip” to the uninitiated.
JRT two…
We couldn’t have picked a more perfect day for the trip. Early spring in Indiana can be cold and stormy (the previous Saturday temperatures hadn’t risen out of the 40’s). The day started out clear and warm and dry. The dry part was important, although we didn’t know it when we left the farm at 7.
The trip took us through south central Indiana, on two lane highways, bordered by blooming redbud trees. Barry spent his youth in this part of Indiana, and it turns out the jeep came from a farm near his former hometown. The road winds through rolling hills and is doted with old farms and small towns. The trip went quickly, given we were trying to keep a lookout for treasures along the way. About the only “jeep thing” we saw was the body of a Willys wagon rusting away in a roadside junkyard.
The drive couldn’t have gone more smoothly, taking a little over two hours. We met Josh, the seller, in a church parking lot in a small town. We had agreed to contact him when we arrived (we were a few minutes early) and he appeared 5 minutes later, driving a large Dodge 4×4 pickup with a giant, but friendly Doberman in the rear. His brother-in-law had come along for the adventure too. After introductions, we headed to the farm and the jeep.
Our towing vehicle for this JRT was Barry’s Ford Ranger 4×4, pulling a U-Haul auto transport. When we reached the farm, after turning off the main road, we had to wait for the farm gate to be opened. On the other side of gate was a path leading up and around a steep hill. We were thankful for the 4-wheel drive and the dry conditions. If it had been raining, we might have had to enlist Josh’s big truck. At the top of the hill was an abandon farm house and out buildings. The rusted hulk of a ’50 or ’51 Ford sat off to the side of the house. The car didn’t look out of place with the other farm equipment scattered about.
We wasted little time getting out and walking to shed to get our first real look at the jeep. The jeep was just as Josh had described it, complete with a couple of flat tires. Josh had planned on building a rock climber, but is moving to the southwest. He had already sold the motor and seats, since he planned to replace those. The body has some rust and some sheet metal repairs, but is in great shape. There are no extra holes cut in the dash and no signs of rust or repair to frame. There was little doubt that we were getting our moneys worth.
While Josh and Evan aired up the tires, Barry got the tow rig turned around and in position to load the jeep. By the time Barry had backed as close as he could to the shed, the jeep had been rolled out and was ready for loading. While we had equipped ourselves with chains, tow straps, and come-alongs for winching, Josh and Ev declared the jeep to be light enough so that we could just push it up the trailer ramps and on to the trailer bed.
It took two tries to get the jeep up the ramps. The jeep rolled easily, but the U-Haul ramps were almost too far apart. The trailer is open in the middle, and as you can see in the picture to the left, the jeep just fit. On our first try, we were too far to one side, but made it easily on the second push. Josh and Ev picked up the rear of the jeep to center it.
It took another 5 minutes to tie the jeep to the trailer, using the provided wheel webs and axle chains. The actual loading process didn’t take more than 15 minutes, but we added a few more minutes just talking and observing the beauty of the old jeep. We headed back down the steep path and were underway in less than an hour from our arrival at the church yard.
We made one quick stop, after about 15 miles to check the tie-downs. The trailer was brand new (still had dealer tags) and it towed, and more importantly, stopped easily. Without an engine, the jeep was light enough so that the added weight wasn’t noticed and the Ranger did a great job. With the exception of a large number of cars pulling out in front of us, the trip home was uneventful – always a good thing.
Back at the farm, Paula had fixed us a BBQ pork lunch and we toasted the new jeep. The post lunch inspection led us to believe the original color was dark blue, so the naming process began. We discussed “Baby Blue” but determined it was too old to be a baby, so just settled on “Ole Blue” for the moment.
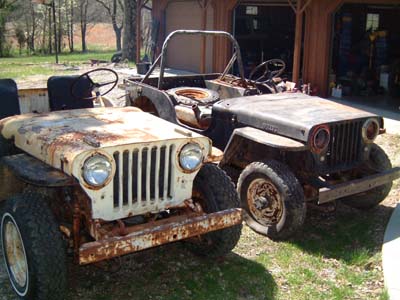
We pushed (Evan did most of the pushing, with Barry steering) Ole Blue off the trailer. More inspections confirmed our initial opinion that the jeep is solid. However, we didn’t find more clues to its real identity. Although advertised as a ’47 CJ2a, we had spotted a CJ3a windshield. The 3a,which replaced the 2a starting in 1949, was very similar to the 2a, with the exception of the new one-piece windshield, plus minor drive train (different rear-end) and interior body changes. Real identification marks and clues had been lost with the motor and vehicle ID tags.
Ev pulled Ole Yeller along side Ole Blue, but we couldn’t see any obvious differences. Ev has since enlisted help form the Willys Tech Board to try and help us make a final determination of what we have. Stay tuned while we search for clues.


Pictures:
Top 3 are of Ole Blue at its former home. The car-carrier. On the trailer, during the trip home. Paula inspecting the running gear. Ole Blue front and back. The patient and donor.
Barry’s notes:
Compared to Old Yeller, I think Ole Blue has had an easier life. It would have been great to save the whole jeep. The JRT was wonderful, if too short. I think dragging jeeps home could become habit forming.
Evan’s notes:
Whether Ole Blue turns out to be another ’47 CJ-2A or a newer CJ-3A, we couldn’t be happier with our purchase. Josh (the seller) was worried we’d be disappointed in the Jeep’s condition… he obviously hasn’t seen our other Jeep.
Part 9 – Fueling around…
Originally posted 06/26/2003
Real Farm Jeep work
The CJ2a had received a complete tune-up, but still was stumbling and stalling under acceleration (see Part 6 ). Our thinking was some good gas and “blowing the cobwebs out” by running the engine might help the problem. We tried both, with no real improvement, but neither was the engine running so poorly that we felt the need to find the source of the problem.
As these things go, the problem came to us. One Saturday, we had loaded up the rear with fencing tools to do some fence repair – real Farm Jeep work! The fact that the fence wasn’t on the back forty (it was the deer/rabbit fence around Paula’s garden) didn’t stop us from driving around the yard a few times before positioning the Jeep along the fence line to act as anchor for the fence stretcher (a come-along, steel pipe and chain affair).
While moving to another stretch point, the motor died and wouldn’t restart. Out of gas? Maybe. Our current gas “gauge” is a wood stick and it showed some gas in the tank. (Note to chief mechanics that we might want to get the real gauge working, although a hammer handle was used as the gauge on the last CJ2a that had worked this farm.) Added gas and with lots of cranking, the motor started.
More fence work, more engine idling and more dying. We took a break from the fence work and drove back to the garage for some analysis. We removed the glass bowl on the fuel pump and cleaned the screen. We then checked all the gas lines to make sure they were clean. We put everything back together and cranked the engine. No gas entered the fuel pump bowl. Hmmm… Not having the chief mechanics available, we guessed that maybe we need to “prime the pump.” Observing all the safety standards (we avoided saying “Hey, watch this!”), we poured gas into the carburetor and fired the engine. The engine ran while we fed gas, but no fuel appeared in the bowl.
Rule number 28 at Lawson Hill Farm says if it won’t start, drag it around the fields with a chain hooked to a tractor and try the old pull start. It worked! We finished up the fence work and took a victory spin around the meadow. It died on the way to the garage. More pulling with the tractor, but no starting this time. We concluded we had a bad fuel pump.
These fuelish things…
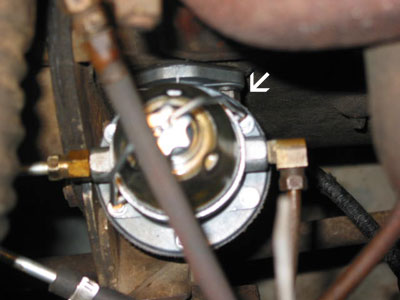
We fired off an order to Rigid Steel and had the pump in a few days. It couldn’t be simpler; two bolts and two fuel lines to remove. Barry decided he can handle this one himself. He started the project early one Saturday. Remove fuel lines (two minutes) – check. Remove bolt number one (two minutes) – check. Remove bolt number two.
Bolt number 2 is nestled between the timing gear cover at the front of the engine and the engine mount underneath. A ½” wrench can be slipped over the head of the bolt, but it can’t move. Time to get out and get under. An off-set wrench can be slipped between the motor mount and timing gear cover, but again, no room to move. The maneuvering to find that it won’t work includes getting covered in 50 year-old grease and dirt in your face and eyes. Gee, it is lunch time already.
Early Sunday morning, with a clean face and a fresh attitude, Barry had determined that a wrench won’t work. He had spied a hole in the motor mount that must be for inserting a socket wrench extension. From years of repairing old tractors, Barry has amassed a fairly complete tool box. He assembled his attack weapon; ¼” drive ratchet, extension and a universal fitting, all plugged into a ½” thin-wall socket. Back under the Jeep.
The socket was too large to fit through the hole, so he pulled the socket off the end and pushed the extension through the hole. There is no room to maneuver under the Jeep and putting the vehicle on jack stands would have helped. But this was a quick project and he would tough it out. After what seemed like an hour to just get the socket back on the end of the extension, it didn’t work. The universal didn’t allow enough of a bend. Time to ask for some help. But it would have to wait another week.
A search of “fuel pump bolt “on WillysTech KnowledgeBase produced 100 messages. Clearly this isn’t a new issue. There were discussions of using a ¼” drive and replacing the bolt with a hex head, but no real details on how to reach the bolt. The next weekend Barry and Evan made a flying trip to Fishers, IN to the first Indiana Flat Fender Gathering. Time to ask for advice. Barry was on target with the ¼” drive, but two universals where required. Never missing an opportunity to buy even more tools, a stop was made on the trip home and a spiffy new ½” socket combined with a ¼” universal seemed the perfect solution.
Sunday morning, bright and early, Barry was under the Jeep again. More grease, more dirt, but no luck. Still not enough angle, even with a second universal. Dejected, but determined, he resorted to staring at the pump and chanting “this is way to hard.”
No one is quite sure how long the staring and mumbling continued but at some point Barry said “If only I could get a socket in between the pump bowl and the frame right here…” And the extension and socket slipped in and aligned perfectly with the bolt head. Remove bolt number two – one minute.
Bolt number one -easy access with a 1/2″ wrench 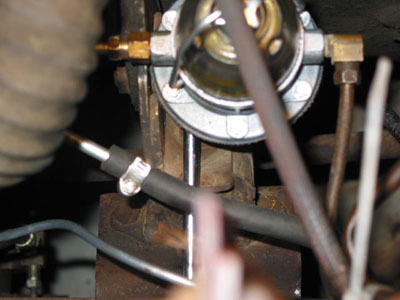
Extension fits between the pump bowl and the frame 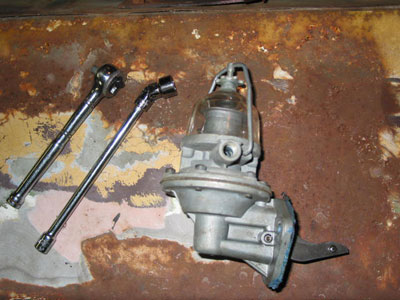
Old pump and the instrument for removal of the number two bolt
The new pump was back on, bolted down and fuel lines connected in less than 10 minutes. Much of that time was taken up with getting the new gasket aligned. Barry finally placed a small amount of grease on the gasket and got it to stick to the pump housing. He cranked the engine and gas rushed into the fuel bowl and the engine fired right up. Success!
A quick spin around the meadow for a test run and things are looking up. The stalling seems to have disappeared, although some choke was required to keep the engine idling. But at least some of our fuel problems have been solved.
Barry’s notes:
I should have known better. Jeeps, like old tractors were built to be maintained and fixed in the field. Most repairs can be made with simple hand tools. I hope I have learned my lessons; don’t make things harder than they are and if it seems like it ought to work like this (easy and simple), it probably does.
Part 10– “Lipstick on a Pig”
Originally posted 07/05/2003
Lipstick on a pig
No one has called our jeep pretty. Not even cute. Too many holes and too much rust. Nothing but a body transplant will do and that has to wait. For now, the task is to make the jeep into a real work machine, or at least outfit it with farm jeep tools.
Accessorizing
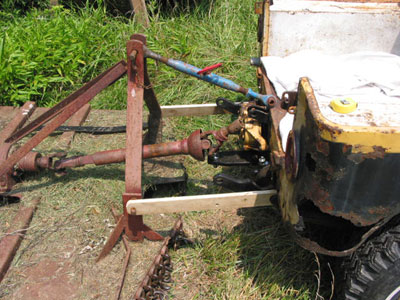
Over the past few months, we have gathered the parts to add to the basic farm jeep setup (rear PTO and draw bar). These included a governor, hydraulic lift to replace the draw bar and a front counter balance weight. These are all bolt-in or drop-in items designed to make the original CJ2a a real farm jeep.
Putting on a little weight
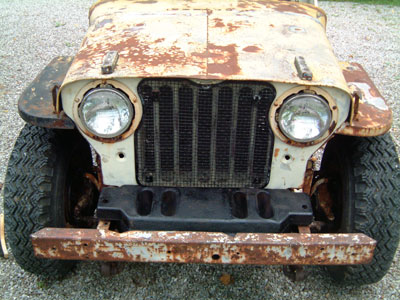
The front weight is a 265 pound work of beauty, forged to set snuggly between the front bumper and the grill, it rests on the frame. Just in case you are concerned with it bouncing out, or being taken while you are not looking, it was cast with mounting holes. And for that easy lifting, it has built-in handles. It also comes with a crank handle hole.
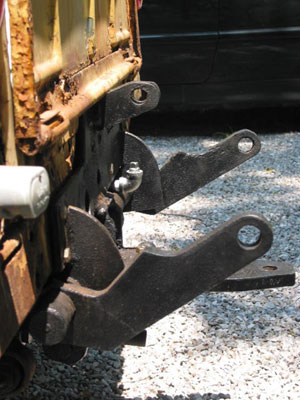
Old Yeller has a plate bolt in between the frame rails. It came with a couple of tow hooks (one broken) and a strange i-bolt contraption welded to the front bumper. The first task was to remove the plate and make room for the weight.
While Barry did a quick paint job on the weight, Evan attacked the plate with the impact wrench. Next came a round with the saws-all and angle grinder to remove the unnatural parts. We did notice the frame has some rough but functional welding. We didn’t bother to clean it up at this point.
Ev pulled the jeep up to the weight – it is not something you want to carry very far – and helped Barry lift the weight in place. The weight has a front lip that slips under the bumper. Inserting the weight involves setting it on the frame and tipping it slightly. The weight fits like a glove.
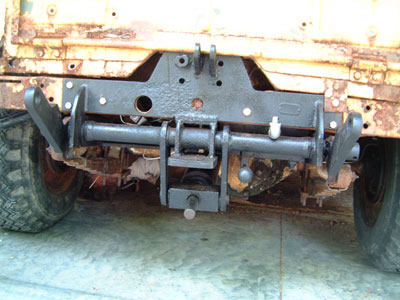

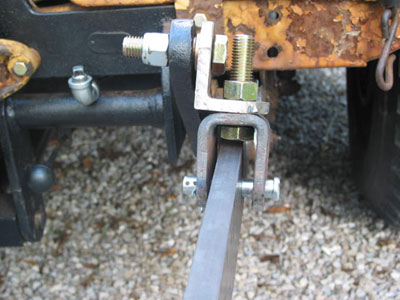
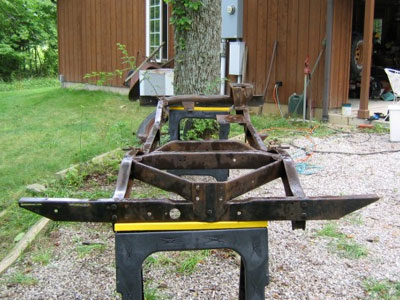
A little lift here
Barry had already removed the all drawbar and PTO in preparation for installing the lift. We had hoped to test the pump and lift before mounting, but we are still hunting for a suitable pump. With lots of towing jobs around the farm, we need a hitch, so the decision was made to go ahead and mount the lift.
The lift weighs over a hundred pounds and is shaped something like a “T”. Using a combination of floor and bottle jacks, we were able to position the lift and raise it to match the mounting holes on the bumper. That was the good news.
When Barry had removed the drawbar, the tie-in bar to the frame on the driver’s side had been broken loose. At some point in the past, the PO has pulled really hard on the corner of the jeep. The bumper is bent out enough so that the hole on the rear cross member of the lift and the hole on the frame cross member are about ½” apart. And for some reason, the lift frame is hitting the body and will not go up as far as needed to meet the frame cross-member.
Rather than fight taking the lift off now, the decision was made to use the bumper bolts to secure the lift and limit towing to light loads. When the pump arrives, we will lower the lift and see if we can make it all fit.
That just doesn’t look right
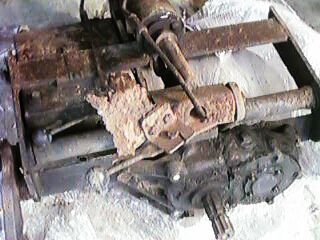
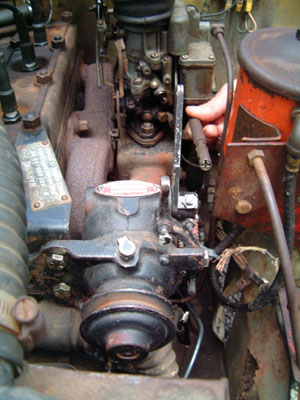
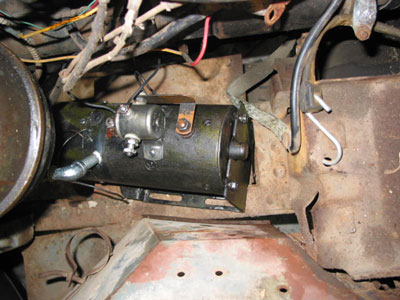
The final accessory was the governor. This was going to be a quick bolt-on and we would have to wait to add the belt to make it operational. But it would be fun to have it in place. Evan was able to mount the frame to the engine block and quickly mounted the governor.
This governor was one of our first finds, but has been sitting in a box for several months. If fact, other than having it out to take photos, we hadn’t paid much attention to how it might work. Once the governor was mounted, it became clear that we either have a governor for a different engine (a stationary engine?), or we are missing a piece that controls the carburetor. In either case, it just isn’t right. Even though we know we have the correct mounting bracket and control cable, it is back to the Net to look for some answers.
Barry’s notes:
As much as I love using my CJ7 around the farm, this jeep is different. It may not be pretty, but it is functional. I can hardly wait to get the lift working.
Evan’s notes:
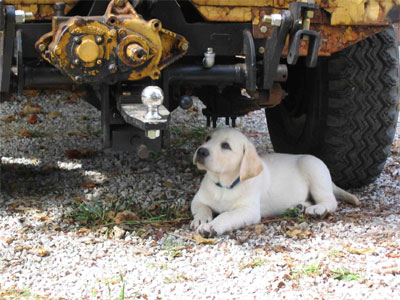
Between the groans of frustration, busted knuckles, and expletives, it might not be obvious to the untrained observer that working on the jeeps is really fun (no, really it is!). Seeing a part here or there go in to place, solving an assembly mystery, or just turning a wrench even when there is no visible proof of progress, always makes me happy. After we finished our tinkering for the day, Barry and I, along with trusty jeep dog Bruin, took the Willys on some of the old trials that run through the woods of the family homestead. Running over logs, through creek beds, and up a 50 degree incline in the old ’47 with smiles on our faces and tongues (and tails) wagging reminded me of another reason I like working on the jeeps: sometimes you get to drive them.
Part 11– Pumping
Originally posted 07/21/2003
Lift off
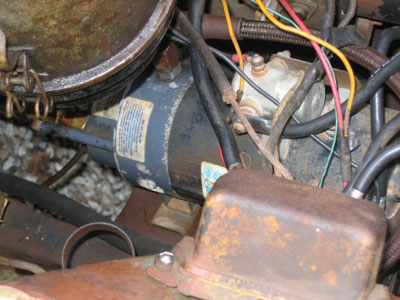
While we continue to search for an original Newgren lift pump, we made a strategic decision to find an alternative so we could make the lift operational. We have collected three different pump configurations. The first is the HY-LO pump normally used with a snow plow. It has its own control valve and reservoir. Since we wanted to use the control valve on the Newgren, this wasn’t going to be our first choice, although it is still a “possible” solution.
Pump number two, a Jack-LO is basically the HY-LO pump. This one arrived with a strange mounting bracket that won’t fit anywhere on the L-head. This one also remains a good “possible” solution with the addition of a fabricated mount.
The third option came in the form of a 12 volt electric pump with attached reservoir, but no control. While not true to the original design, later model Newgren lifts either came with or were retrofitted with electric pumps and controls. This option appeared to be the most straight-forward approach.
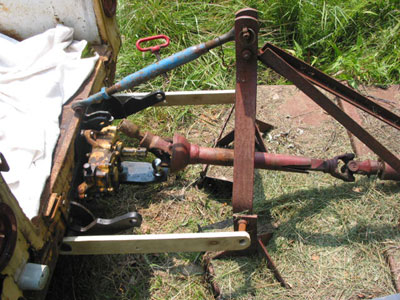
Plumb tickled
The first order of business was to plumb the lift to make sure it would work with the pump. Since the pump placement is going to be different for our three choices, we are starting with off-the-shelf parts from the local hardware and farm supply stores. This simple act resulted in no less than four hardware store runs and two farm store runs spread over two weekends. The hardware store is 20 minutes away and the farm store is 45 minutes away. The resulting “temporary” configuration is a jumble of “parts.”
We had mounted the lift (see part 10) temporarily and hadn’t been able to get it in the correct position. So Barry decided to remove the lift, lowering it enough to allow for easy access to the control valve and various hoses. It took Barry about an hour to slowly lower the lift.
Start’er up
The next task was to remove the old hardware from the pump and ensure it was in working order. The old hardware came off without a problem. Next was a quick electrical test. The motor is marked 12v and has a solenoid for on/off control. Barry attached jumper cables to the terminals and shorted the solenoid top control terminal to the positive cable. Nothing. He then shorted the positive terminal to the motor terminal and it sprung to life! Good news. Replace the solenoid and we should be set.
Luckily the chief mechanics were available to review the project. Barry’s dad suggested that the solenoid might be switched on the ground side. A quick test and it worked perfectly! Saved once again from replacing a perfectly good part.
5-4-3-2-1
Barry added a toggle switch across the solenoid and the ground terminal. When mounted in the jeep, we will place the switch on the dash and only use the pump when needed. After attaching the hoses, and filling both reservoirs as best he could, he throw the switch. LIFT OFF.
Well, actually, the cylinder did extend without anyone moving the control valve. It must have been stuck in the open position. Barry quickly turned off the pump and was able to move the valve to the “down” position and retract the cylinder by hand. He flipped the switch again and nothing happened. Perfect! He moved the control valve and the cylinder extended. Moved it to the down position and, applying a little weight, the cylinder arms went down. After the fourth or fifth cycle, the cylinder seemed to slow. More testing needed, but the weekend had ended.
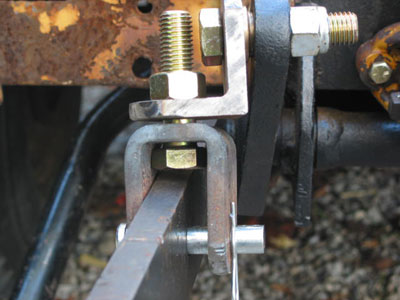
Like a glove
Not having the Willys available for rides and work was enough of a motivator for Barry to get the lift back on. He was able to use a combination of jacks and wood blocks to get the lift in place. He had installed an elbow on a hose that he thought was preventing the lift from lining up correctly. It quickly became clear that the hose was fine and something else was preventing the rear of the lift from moving into the proper position. What the eye couldn’t see, the hand could feel. A muffler hanger bracket was still attached to the middle of the frame. The perfectly matching rust of the frame and bracket made it almost invisible.
A couple of busted bolts later, the lift slipped into place. There was still the matter of the bent bumper and a pry bar between the side rail and lift was required to get a bolt inserted. Tightening the bolt drew the passenger side into perfect alignment.
Weighing in
While on jacks, the lift had appeared to operate normally. With the lift attached to the frame, we were ready to do a real test. With Barry (weight not revealed, but plenty for testing purposes) standing on the short arms, Paula worked the rear controls. Barry had a quick trip up – a great feeling. However, if the control was returned to the neutral position, the lift dropped. Fluid appears to be leaking past the control valve. Bummer. It looks like a rebuild of the control valve will be needed. That means dropping the lift again. For now, on the advice of the chief mechanics, we will continue to operate the lift and see if the seals might swell enough to “heal” the leaking problem.
Like a glove – part II
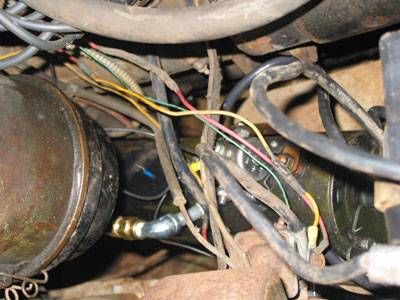
Ron Ingram’s CJ3B has the reservoir mounted in front of the battery (http://www.film.queensu.ca/CJ3B/Photos/Farm/IngramEngine.jpg). It appeared there is plenty of room for our pump there too. A quick measurement verifies that the pump should fit nicely. All that is required is to remove the starter switch and voltage regulator from the fender, along with removing the battery. The pump is heavy, about 30 pounds and will need to be securely fastened. The generator splash shield, while not supported on the engine side, makes a nice shelf. There also appeared to be a tie-in point near the motor mount; a pre-existing hole in the splash shield right at the motor mount aligns perfectly with the pump base. For now, that single bolt seems enough to prevent any movement. When we replace the body we will fabricate a more secure mount bracket.
The location made wiring a breeze. Short starter cables were run to the chassis ground bolt and to the hot side of the starter switch. The on/off switch was mounted in one of the radio knob holes for now. A quick test and everything is working great! We had considered adding a light to indicate the lift pump was running (to prevent running down the battery). The pump is actually quite loud, even audible when the engine is running, so that won’t be necessary.
Next up, making the implement arms and installing the driver compartment controls.
Happy 1st JRT Anniversary!
Originally posted 07/28/2003
Happy 1st JRT anniversary!
It has been a full year since we ventured to Moline, IL to retrieve “Old Yeller.”
Barry’s notes:
Among my many saved emails is one sent to Evan dated July 15 and titled “Now this looks like a real Jeep…” and pointing to an e-bay ad. Ev wrote back, saying “I’m game if you are.” And so it began. It has been literality a “great ride” although I have noticed a few things. The garage at the farm is full of Jeeps; Four, to be exact, in a three “car” garage. Farm projects have slowed, with all “free” time being spent tinkering with “Old Yeller.”
I also have seem to have picked up a few new addictions. These include daily (sometimes several times daily) searches of e-bay for Jeep parts and daily (sometimes several times daily) reading of Jeep forums. I can’t see an ad for a “parts” Jeep without considering the possibilities.
It really doesn’t seem possible that it has been a year. We have met all kinds of interesting and wonderful people, learned a lot and enjoyed every (well almost) minute of the adventure.
Evan’s notes:
A few Surprises
While I knew a project Jeep would be great fun for the grandfathers, Barry, and I. It is wonderful to see my mom, Paula, having so much fun with it too.
Some Greatly Appreciated Help
Both my grandfathers, P.D. and Forrest, have truly been our “Chief Mechanics,” saving us countless hours with their observations and their years of experiences, working on the 50-some-odd year old machines.
Waxing Philosophical
Looking at the old Jeep is a litmus test of sorts; you either see the potential for what could be again, memories of what was, or a rusty old bucket of bolts. My dad sees the potential, my mom the memories, and with a sly smile, my wife sees a bucket of bolts that seems to make all of us happy.
And in the End
I can’t believe I forgot how much we all love Jeep rides.
Part 12 – Up in Arms
Originally posted 09/08/2003
Up in Arms
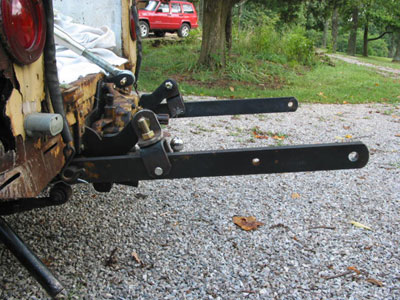
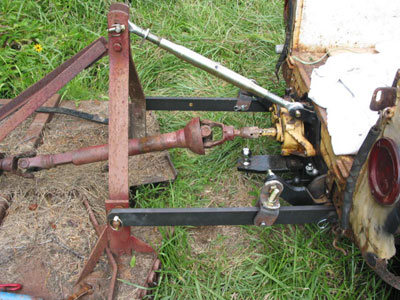
It has been almost a year since we acquired the Newgren lift. We have continued to search for the missing implement arms and linkage, but haven’t been able to do better than a few pictures. Rather than wait, we decided to fabricate a set of arms, based on the documentation available.
Measure twice
The arms are actually very simple. Unlike most tractor arms, they don’t have knuckles (ball joints) on the ends. They are a simple metal bar with three holes. The linkage between the short lift arms and the implement arms was more complicated. In the end, we used a simplified linkage approach for now.
We first created wooden models, since we were going to have to have the metal bars made by a local welding shop. We based the length on the pictures we had and by attempting to scale the drawings included in the mounting instructions. Our test equipment was a bush hog, which would involve the PTO in addition to the lift. As can be seen from the picture, the arms were too short to allow the PTO hook up. This was a simple fix at this stage; we built a second set of wooden arms, adding 6” to the length.
Barry took one of the wooden arms as a pattern to his local welder. He also took copies of the pictures we had of the linkage. The building took a couple of weeks, and involved ordering the steel bar (3/4”) and sending the arms to a machine shape to have the large holes drilled. The machine shop broke a couple of bits and it delayed the process by a week. But the end product turned out well and the arms fit perfectly.
The linkage presented more of a challenge for the welding shop. In the end, they simply made an “L” shaped hanger and forged “U” brackets to attach to the implement arm. We are using ¾” grade 8 bolts to hold everything together.
Topping it off
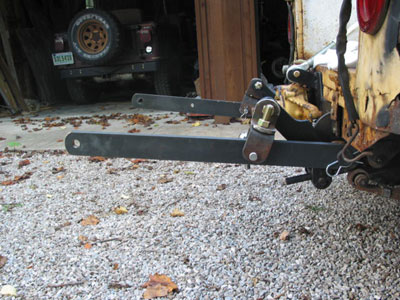
While the arms where being made, Barry tackled the problem of the top link (the third point of the three point hitch) The pictures seem to show a two-part steel bar, with holes allowing for length adjustments. From a practical standpoint, this was a much inferior design to the more common screw-type top link. We may replicate the adjustable bar for show purposes, but for doing actual work, we will use a standard screw-type bar.
The top link on the Newgren is not as wide as those on modern tractors. Barry had to grind the “ears” off of the knuckle on one end of a store-bought link. It fits perfectly and allows for easy adjustments when mounting implements. That is a trait not shared by the implement arms.
The don’t make’em like that any more
When Barry finally picked up the arms, he couldn’t wait to try them out. The arms are very heavy; ¾” steel bars, 2 ½” wide and 30” long. The hangers are simple and still allow for height adjustments by raising or lowering the nuts. Everything fit perfectly and went together with a few bolts and pins.
Although not clear from the drawing or pictures, it appears that a bushing was used in the hole of the small lift arm. The holes where either cut to the rough dimension or have wear. In either case we felt a bushing was needed and are using a bronze type found at the local hardware store.
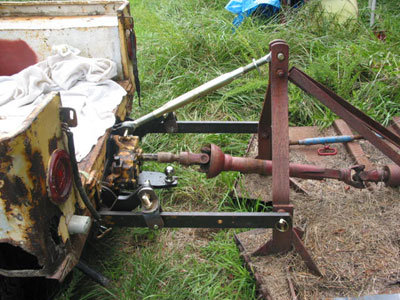
The hole thing
Once assembled, Barry drove the jeep out to meet the bush hog. He had several observations. First, while it is easy to see out the back, the lack of power steering makes aligning the lift and implement a challenge. Second, on a tractor, those knuckles on the end of the implement arm are forgiving; they allow you to slide the arm on even when not perfectly aligned. Not so with solid ¾” bars with holes just large enough to accept the implement pins. The Newgren method requires pulling, tugging and lots of swearing. This is going to take practice.
Much to his dismay, Barry discovered that one of the holes had been drilled to small. It was an 1/8” off. Back to the house and into town for a 7/8” drill bit to finish the job. But Barry did have enough evidence that the arms where the right length and that the thing might actually work.
Mower than we bargained for
A day and $10 (the cost of the bit) later, Barry tried mounting the bush hog again. After much backing, pulling forward, swearing and backing again, he got the arms on the bush hog and the top link attached. Now for the test. He pulled the control to raise the lift and … Squat. That is what the jeep did, but the bush hog wouldn’t come off the ground. Granted, this is the heaviest 3-point implement we own, but the Newgren should be able to lift it off the ground. More work is needed on the pump.
Going with the flow
Evan was able to come down for some more testing. Based on the advice of the chief mechanics, he added more fluid to the reservoir. He rode up and down on the arms a few times and declared it ready for another test.
This time the target was a plow. This plow a “2-14s” is bigger and heavier than the recommend “2-12s” but should be good for testing. Evan did the driving and Barry did the directing. It was clear that two people make the job of implement mounting much easier. With more tugging, the plow was mounted. Evan hit the lift switch and the plow came up – but just a little.
We disconnected the between-seats control lever to ensure we weren’t limiting the valve travel. It helped a little (we will need to adjust the forward rod when this is all working), but still not a full lift.
Back to the garage for more fluid and load testing. We both stood on the rear arms and worked the pump. One more time to the field and this time some success. However, it was clear that we have too much linkage space between the lift and implement arms. We could gain a couple of inches in height by flipping the “L” brackets over.
One more trip to the garage. The simple design of the linkage made the change easy. We replace the bolts with slightly (1”) longer versions and headed back out to the field. This time the target was an old carry-all. More tugging and pulling to get the carry-all mounted, but the lift worked better.
That doesn’t sound right
The lift valve is making lots of noise when under load. Although the instructions say “no adjustment need to the factory settings” it may be that 50 years of rust and dirt have taken their toll. More bleeding and cleaning seem to be in order and the underbody design makes it hard to get at the parts. We may just live with the slow lift for now and are seeking professional advice on next steps.
But at the end of the day, we have a real live working Farm Jeep!
Barry’s notes:
Lots of lessons learned here. First, I still like the Newgren basic design. The arms come off by pulling four pins and are out of the way when not in use. Second the Newgren arm design makes single person implement mounting tough. I think I may make a second set of arms with knuckles on end. Too much pulling and tugging required with the real thing. They will be nice for shows (someday) and I don’t regret going this route.
Feb. 2004 – Aug. 2005 Update
Originally posted 08/20/2005
Meanwhile back at the ranch…
For a variety of reasons we have really gotten bogged down, both in working on the projects, and updating the site. Some work has been done, so consider this our catch-up.
1947 Willys Jeep CJ-2A: Project “Old Yeller” Update
In the mean time, we have been using the rust bucket ’47 as a real farm jeep. It is pulling wagons and hauling tools. Still fighting the hydraulic pump setup on the Newgren and are still searching for a proper pump. But it got a new set of seat covers (Barry’s Father’s Day gift) and it was a real “lipstick on a pig” event. Sure does make getting in and out a lot easier. The original seats had the vinyl worn through and you got snagged by a spring wire now and then.
1949 Willys Jeep CJ-3A: Project “Ole Blue” Update
Frame cleanup
POR-15
“New” engine
Wheel clean-up
Tires for the 3a
We are in the process of finishing the frame (needs a top coat) and making the final list of “parts” needed to get to the 3a to the rolling chassis stage. Hope to have that done in the next month or so.
Non Jeep Update
New Jeep dog
Additional Willys storage
Part 13 – Pumped
Originally posted 09/15/2005
Pumped – Part II
Over the past few months, “Old Yeller” has been doing farm duty as pickup and wagon hauler. The 3 point lift simply hasn’t worked well enough to be a useful tool. The new tractor has a backhoe, and although relatively easy to remove and remount, it means a 3 point lift isn’t always available. So that was reason enough to revisit the lift.
Although our research (see part 11) showed a two reservoir system (one on the lift and one on the pump) should work, we have not been able to make the lift to work properly. So we decided to try using a pump without a second reservoir.
Our first attempt was to mount a Hy-Lo pump on the generator, rerouting the ram hose to the use the Hy-Lo control. We had the same issue – not enough lift. We also discovered a seal leak on the pump. Our conclusion was this wasn’t the solution.
Back to e-bay
Barry, in his daily wanderings through e-bay, found a used 12 volt pump, without a reservoir. This pump fit nicely in the same space occupied by the old pump/reservoir setup. In a rush to get a test done, connections were made to the ram and the Newgren reservoir. However, a quick test with the plow was another disappointment. The plow would not lift completely.
Time for the pros
Prior to and since acquiring his new tractor, Barry has been hanging around www.tractorsbynet.com. He took are lift questions to the parts and repair forum. Early suggestions included the possibilities of leaky “o” rings in the control valve. That seemed like a real possibility, since the valve doesn’t appear to have been touched in the past 50-some-odd years. Getting to the valve means dropping the lift.
By chance, another board member posted a question about how to learn about hydraulic systems. He was pointed to an Army Field Manual here.
Hosed
While reading the manual, Barry realized that he had failed to re-attach a small hose from the ram to the reservoir. For the ram to function properly, this hose needed to be in place. Since the Hy-Lo pump wasn’t set up for this line Barry had chosen to cap the ram. Now realizing that the return line served an important role, it also helped explain why the Hy-Lo pump hadn’t worked. The line had been in place with the old two reservoir system, so that eliminated it as a source of our problem there.
Up-lifting!
Somehow, in the process of changing out the pumps, the fitting need to reattach the return hose was lost. After a couple of trips to the hardware store, the proper fittings were found. Time for another field trip.
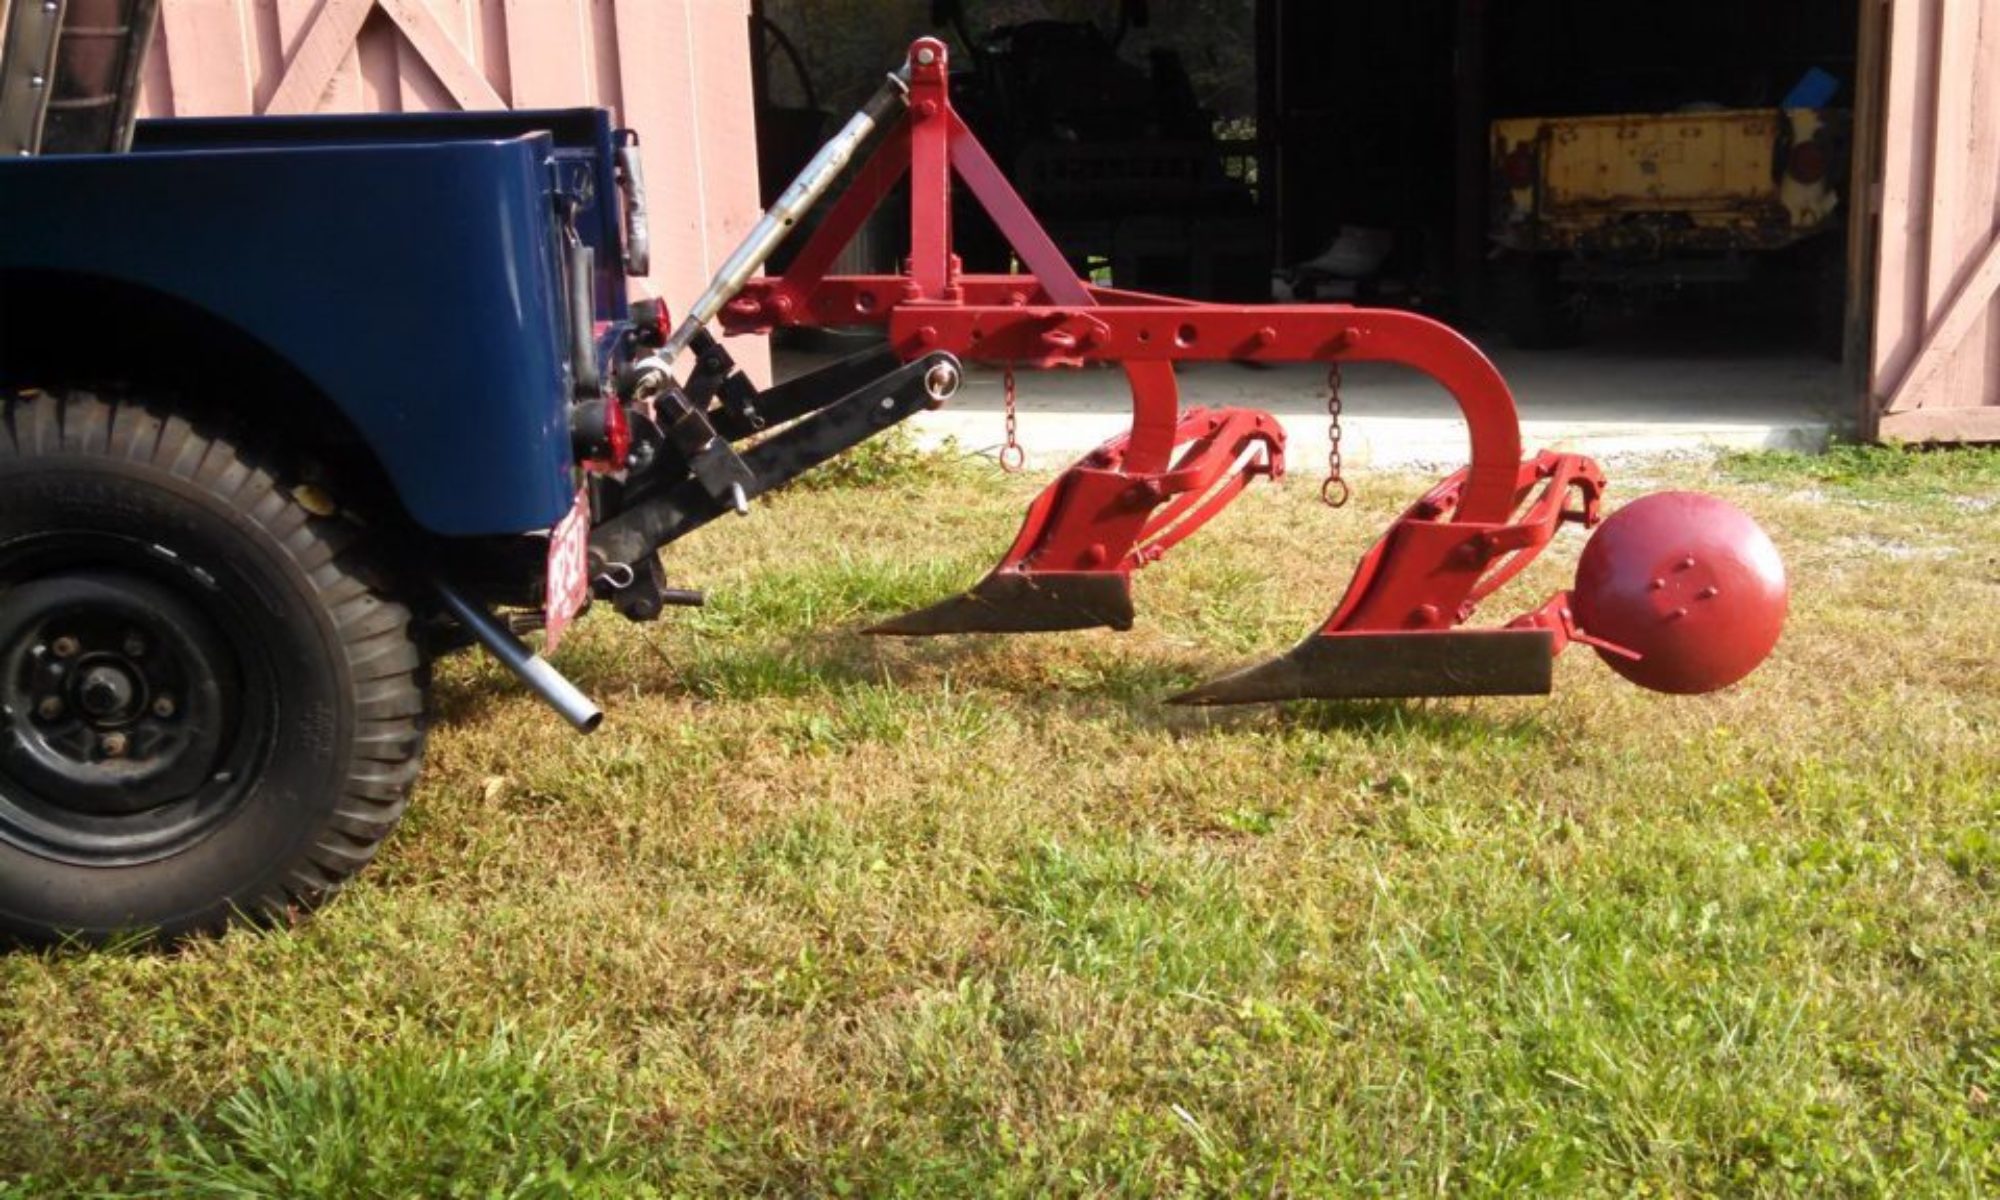
This time, the two-bottom plow lifted smoothly. Barry did notice a few leaks, so disconnected the plow and headed to the garage. After a few turns of the wrench, and taking the time to reconnect the between-the-seats control, back for another try. This time, the target was a 3 point blade. The blade is much lighter than the plow, but Barry had some real work to do, so off he went.
As the action shots show, the jeep worked like a real tractor, grading gravel in front of the new barn. The blade lifted smoothly and the between-the-seats control worked great.
Observations
Even with the pump running, the blade falls slowly. My guess is that the Tractor by Net pros are correct and the “o” rings are leaking. Since a rebuild of the control will require dropping the lift, we can live with the problem for now.
Barry’s notes:
I feel pretty silly not realizing that the ram return hose was important. These old machines weren’t designed with “spare” parts. The lift isn’t perfect, but is sure fun to use.
Part 14
Part 15